
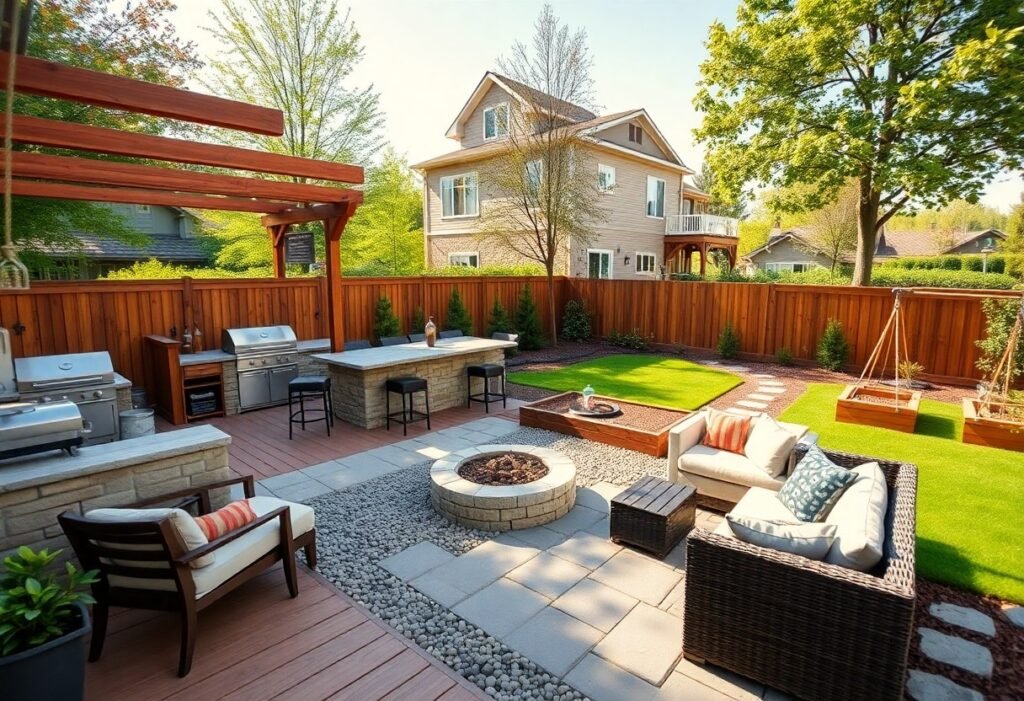
Over 70% of homeowners who optimize their outdoor space report increased daily use of their backyard. You can transform your yard from an underused expanse into distinct areas tailored to cooking, relaxing, playing, and entertaining. By thoughtfully assigning purpose to each section, you create a layout that supports your lifestyle and enhances your home’s livability.
Assessing Your Space: Key Factors to Consider
Begin by evaluating your yard’s dimensions, shape, and existing features such as trees, slopes, or structures. Consider how you and your household intend to use the space-whether for dining, lounging, gardening, or play. Foot traffic patterns, privacy needs, and proximity to the house also influence zone placement.
- Measure total square footage and note fixed elements like sheds or patios
- Observe how neighbors’ views impact your privacy
- Identify areas prone to standing water or erosion
- Factor in local climate and typical wind direction
Knowing these elements shapes a practical, personalized layout that aligns with your lifestyle and property constraints.
Analyzing Microclimates and Sun Exposure
Sunlight varies across your yard due to shadows from buildings, trees, or fences. Spend a day observing which areas receive full sun, partial shade, or full shade throughout the hours. South-facing zones typically get the most sunlight, ideal for dining or vegetable gardens. North-facing spots tend to stay cooler, better suited for seating or shade-loving plants.
A mid-sized SaaS firm with a west-facing backyard noted afternoon heat made early evening use uncomfortable until they relocated seating under a pergola. Tracking sun patterns over time reveals optimal spots for different activities.
Identifying Property Lines and Utility Access
Building too close to a boundary can lead to legal disputes or forced removal of structures. Verify property lines using your deed, a survey, or a professional land surveyor before installing permanent features. Overlooking this step has led homeowners to dismantle decks or fences after neighbor conflicts arose.
Utility lines-both overhead and underground-restrict where you can dig or build. Contact your local utility marking service to locate gas, water, electric, and communication lines. Installing a fire pit above a gas line or a tree near a septic tank creates safety hazards and costly repairs.
One homeowner in Portland installed an in-ground irrigation system without checking underground lines and severed a fiber optic cable, resulting in a service outage and a repair bill exceeding $2,000. Confirming utility locations beforehand prevents such incidents and ensures compliance with local codes.
How to Map Your Functional Layout
Creating a Scaled Master Site Plan
Begin by sketching your backyard’s perimeter to scale on graph paper or using digital design software. Include existing structures like your home, fences, and permanent plantings to anchor your plan accurately. A mid-sized SaaS firm might use similar precision when mapping server architecture, and the same attention applies here. Mark key features such as utility lines, slopes, and drainage points to avoid costly conflicts later. Each inch on your plan should represent a consistent measurement, such as one foot in real space.
Planning for Traffic Flow and Natural Transitions
Pathways should guide movement between zones without forcing detours or bottlenecks. Use natural materials like gravel, stone, or pavers to distinguish walkways while maintaining visual harmony. Consider how many people typically gather during events and design routes wide enough to accommodate groups. A curved path can slow pace and invite exploration, while straight lines suggest efficiency and direct access.
Foot traffic tends to follow the shortest practical route between high-use areas, such as from the kitchen door to a dining patio. Position transitional elements like stepping stones or low hedges to gently steer movement and define boundaries without walls. In one suburban project, a narrow flagstone trail reduced lawn compaction by 40% compared to informal dirt paths worn over time. These subtle cues maintain order while preserving openness.
Professional Tips for Defining Zone Boundaries
Clear boundaries transform a sprawling yard into a series of intentional spaces. Landscapers often use changes in elevation, such as a few built-in steps or a raised patio, to signal a shift from one zone to another. Edging materials like stone, metal, or brick create clean lines that define areas without blocking sightlines. A mid-sized SaaS firm redesigned its campus courtyard using low hedges and gravel strips to separate walking paths from seating nooks. Lighting choices, such as path lights versus ambient lanterns, further reinforce where one function ends and another begins.
- Use changes in elevation or surface materials to distinguish zones
- Incorporate low hedges, planters, or edging for subtle separation
- Align lighting types with specific area functions
- Match structural elements like pergolas to zone purposes
Recognizing how people naturally move through space ensures pathways don’t cut through quiet areas.
Utilizing Hardscaping and Vertical Structures
Stone patios, concrete pads, and interlocking pavers provide durable foundations for high-traffic zones like dining or cooking areas. These materials contrast effectively with grass or mulch, instantly signaling a change in use. Vertical features such as trellises, lattice panels, or short block walls add height and privacy without closing off the entire space. A coastal home in Oregon uses a cedar screen to shield its reading nook from sea winds while maintaining openness to the garden.
Such structures also support climbing plants, blending built elements with greenery over time.
Strategic Furniture Placement for Visual Separation
Arranging furniture in distinct groupings helps the eye recognize separate areas, even without physical dividers. A dining set with a large umbrella occupies visual weight, anchoring the outdoor kitchen zone. Lounge chairs arranged around a fire pit form a natural conversation circle, distinct from nearby play areas. Orienting seating to face focal points like water features or gardens reinforces each zone’s purpose.
Spacing each arrangement at least six feet apart prevents overlap and maintains functional independence.
Designing the Culinary and Dining Zone
Positioning your outdoor kitchen near the house simplifies access to indoor utilities while maintaining visual connection to the interior. A mid-sized SaaS firm’s backyard renovation prioritized proximity to the kitchen door, reducing serving distance and enhancing workflow during gatherings. Countertop materials like stainless steel or stone withstand weather and frequent use, especially when shaded from direct southern exposure.
Selecting the Ideal Kitchen Orientation
Align the cooking area to avoid prevailing winds blowing smoke toward seating. An east-facing grill captures morning light without afternoon glare, improving visibility during evening prep. Position the stove downwind of dining spaces to prevent odor accumulation where guests eat.
Gas lines or electrical outlets should remain accessible but concealed beneath cabinetry or decking. A coastal California project routed utilities through a raised planter, hiding infrastructure while adding greenery.
Factors for Ergonomic Outdoor Dining
Comfortable dining relies on proportional spacing between table edges and seating, allowing room for chairs to slide back. Maintain at least 36 inches between the table and any fixed boundary, such as a wall or shrub line. Choose seat heights that align with table dimensions-typically 18 inches for standard tables.
- Use cushioned seating with quick-dry foam for prolonged comfort
- Ensure tabletops are within 28-30 inches of the ground for ease of use
- Provide shade via pergolas or umbrellas to reduce glare and heat
- Space chairs at least 24 inches apart to prevent crowding
Thou shall prioritize posture support by selecting chairs with lumbar contouring and stable legroom.
Materials matter when balancing durability and comfort-teak and powder-coated aluminum resist moisture and UV damage while aging gracefully. A desert-adjacent home in Arizona used rust-resistant hardware and UV-stabilized fabrics, ensuring longevity despite intense sun exposure. Table edges should be rounded to prevent injury during movement.
- Opt for non-slip flooring beneath dining sets to prevent accidents
- Integrate ambient lighting at 30-50 lumens for evening visibility
- Include a nearby serving ledge for platters and drinks
- Allow 48 inches of clearance around the table for unhindered circulation
Thou shall test chair stability on the actual surface-uneven pavers can compromise balance.
Creating Relaxation and Social Hubs
A well-placed seating arrangement invites conversation and comfort, transforming unused corners into vibrant gathering spots. Group low-slung sofas around a central table to encourage interaction, choosing weather-resistant materials that withstand seasonal changes. Consider a mid-sized SaaS firm’s employee lounge design, where modular furniture fosters both collaboration and downtime.
How to Position Fire Features and Lounge Areas
Place fire pits or built-in fireplaces at the edge of a seating zone to anchor the space without obstructing movement. Maintain a three-foot clearance around all sides for safety and comfort, aligning the flame source with seating height for optimal warmth and ambiance. A linear gas fire table can double as a coffee surface when not in use.
Face seating toward the fire feature at a 90-degree angle to create intimacy while preserving sightlines across the yard. Avoid centering the fire in an open lawn, which can make the area feel exposed. Instead, tuck it near a retaining wall or deck railing to define the boundary naturally.
Integrating Privacy Screens and Softscaping
Bamboo panels or lattice screens mounted on posts offer immediate visual barriers without blocking airflow. Position them along property lines or between zones to reduce noise and create psychological separation. Pair with climbing vines like jasmine to soften edges and add fragrance over time.
Evergreen shrubs such as boxwood or laurel planted in staggered rows form living walls that thicken with age. Space them 18 to 24 inches apart to allow for growth while maintaining a cohesive line. These plantings buffer street views and wind, enhancing comfort in seating areas.
Use ornamental grasses like fountain grass or miscanthus in large planters to introduce movement and sound near seating nooks. Their narrow footprint suits tight spaces, and their seasonal color shifts keep the area visually engaging year-round. Combine with hardscape elements such as stone benches for balanced texture.
Specialized Zones for Play and Utility
Safety Tips for Children’s Play Areas
Surfaces beneath play equipment should consist of shock-absorbing materials like rubber mulch or poured-in-place rubber, especially under swings and slides. Position play structures at least six feet from fences, walls, or other yard features to prevent entrapment hazards. Anchor all freestanding units securely to resist tipping, and avoid placing them over uneven ground or near overhead power lines.
- Maintain a clear use zone around moving parts
- Inspect hardware monthly for wear or rust
- Choose age-appropriate equipment without sharp edges
Knowing the recommended fall height ratings for each piece ensures long-term safety compliance.
Designing Discrete Storage and Service Stations
A well-placed utility shed near the garden reduces trips for tools while keeping them out of main living areas. Consider a louvered cabinet under an exterior sink to hide hoses and cleaning supplies. Integrate ventilation slots to prevent moisture buildup and use lockable latches for security. Camouflage larger units with climbing vines or matching siding to maintain visual harmony.
Include a dedicated bin for compost or recycling near the kitchen zone to streamline waste disposal during outdoor meals. A mid-sized SaaS firm managing remote teams might prioritize digital tools, but your backyard relies on physical organization-store cushions, grills, and gardening gear within arm’s reach of where they’re used. Concealed access panels or bench seating with lift-up lids offer hidden compartments without disrupting the aesthetic.
Final Words
Dividing your backyard into functional outdoor living zones transforms unused space into a personalized extension of your home. By aligning each zone with your lifestyle-whether for cooking, relaxing, or play-you create distinct areas that serve real, daily purposes. A well-planned layout in a mid-sized SaaS firm’s employee retreat included separate gravel lounges, a covered dining deck, and a sunken fire pit, proving scalability across property sizes. Your design choices, from materials to placement, determine how naturally movement flows between spaces.
Success lies in balancing aesthetics with practicality, ensuring transitions feel intuitive rather than forced. Using changes in elevation, plantings, or paving types can subtly guide use without rigid barriers. You maintain flexibility by choosing modular furniture and multi-use features, like benches with hidden storage or pergolas that support lighting and climbing plants. The result is an outdoor environment that feels both structured and organic, tailored precisely to how you live, host, and unwind.